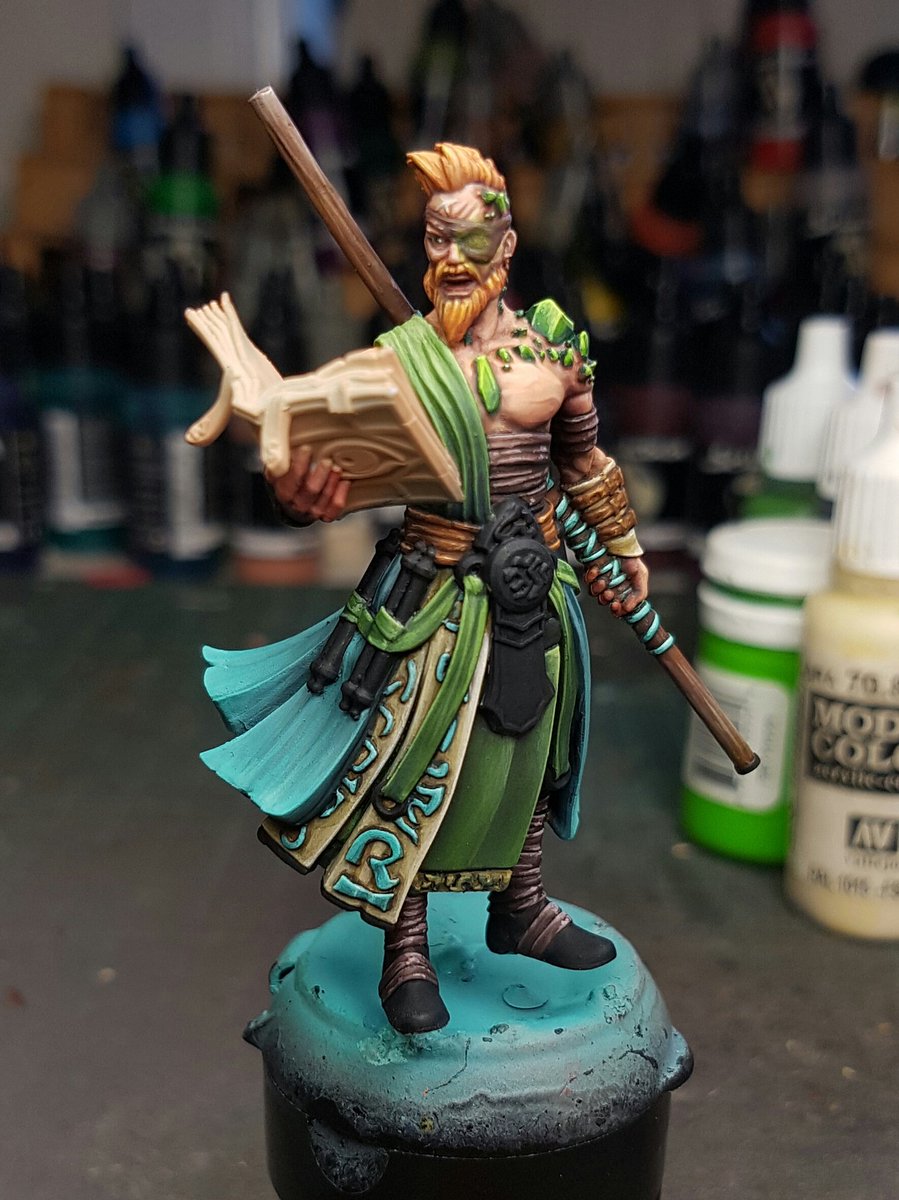
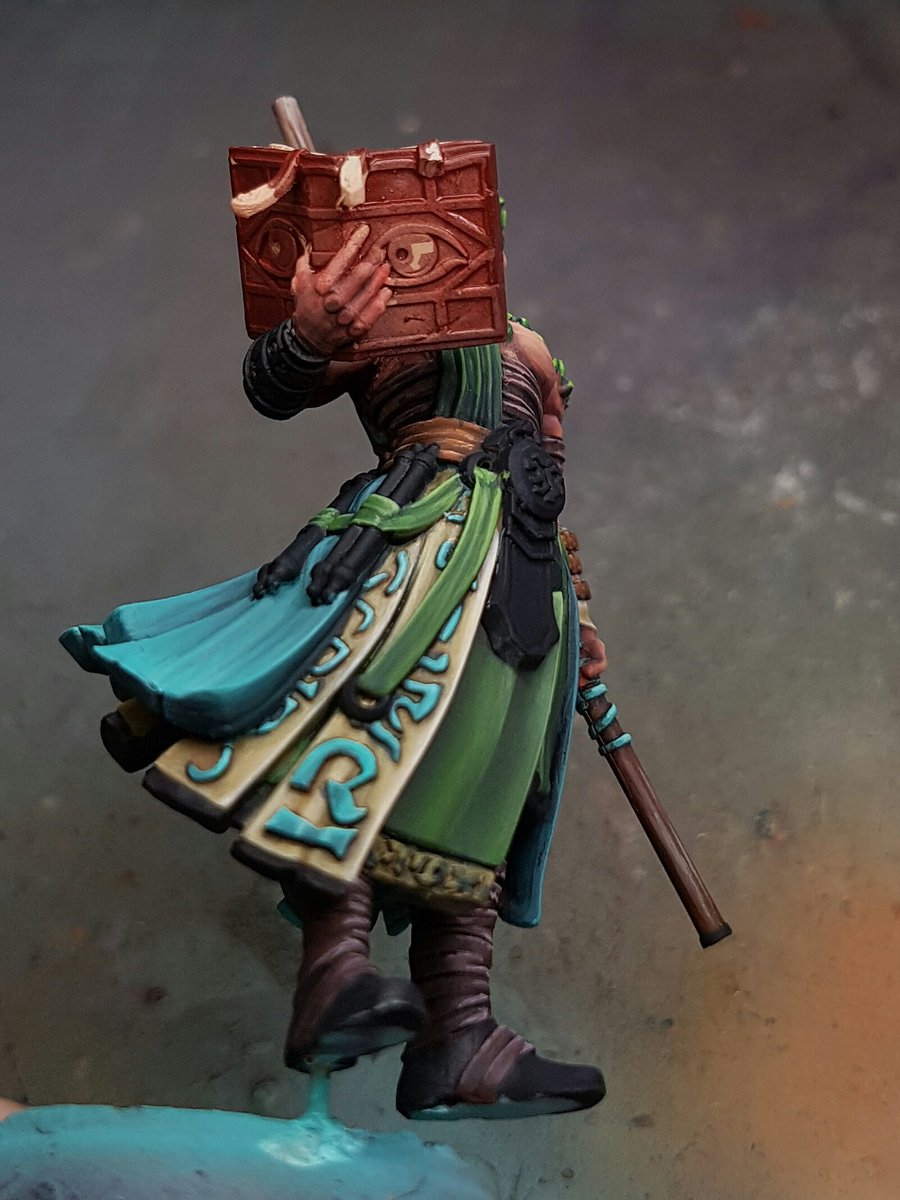
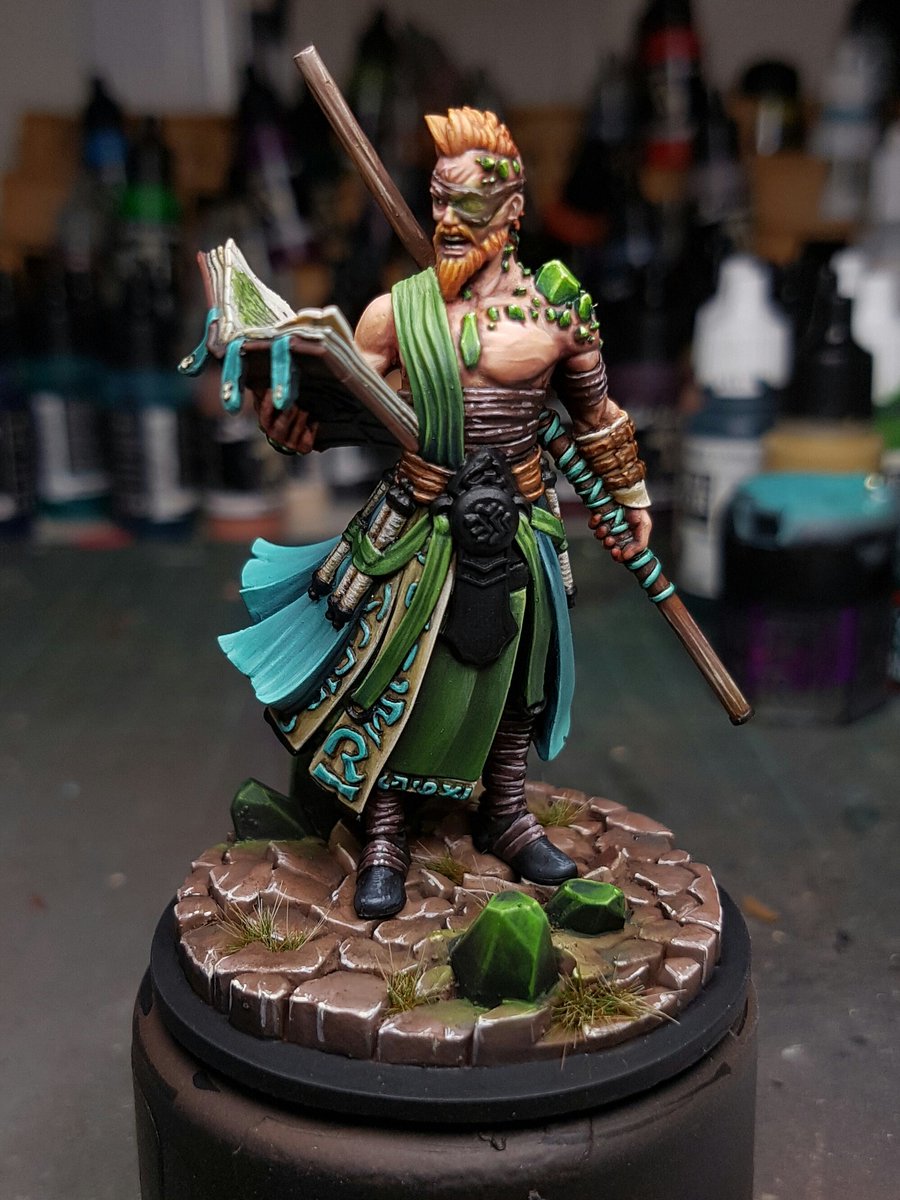
I finished work on Bastian.
You can find him here:
Bastian on Putty and Paint
And for more information onf Judgement:
Judgement Facebook Page
More photos on the P&P page.
Cheers
Trent
Wednesday, 18 January 2017
Tuesday, 17 January 2017
Judgement: Bastian Part 3
So at the close of the last blog post, I had a pretty nice surface to work off. The majority of the colours were down, and it was now a matter of building on those layers, creating texture and interest in some areas, and highlighting up to create contrast and pop.
The first area I did was finalise the green tone. I wanted to do was make sure that the green was more desaturated than the green on the crystals, it needed to look harmonious but not take all the focus away from the rocks. I shaded it down with more red and dark blue colours, to deepen it and smooth it out. I then started on the bone coloured sections, I've often gone overboard with that colour because I think it looks so good when well painted, but this model it really worked with the other colours.
From there I kept building on the colours, adding a slight green glow to the eyepatch and adding blue wrapping to the staff.
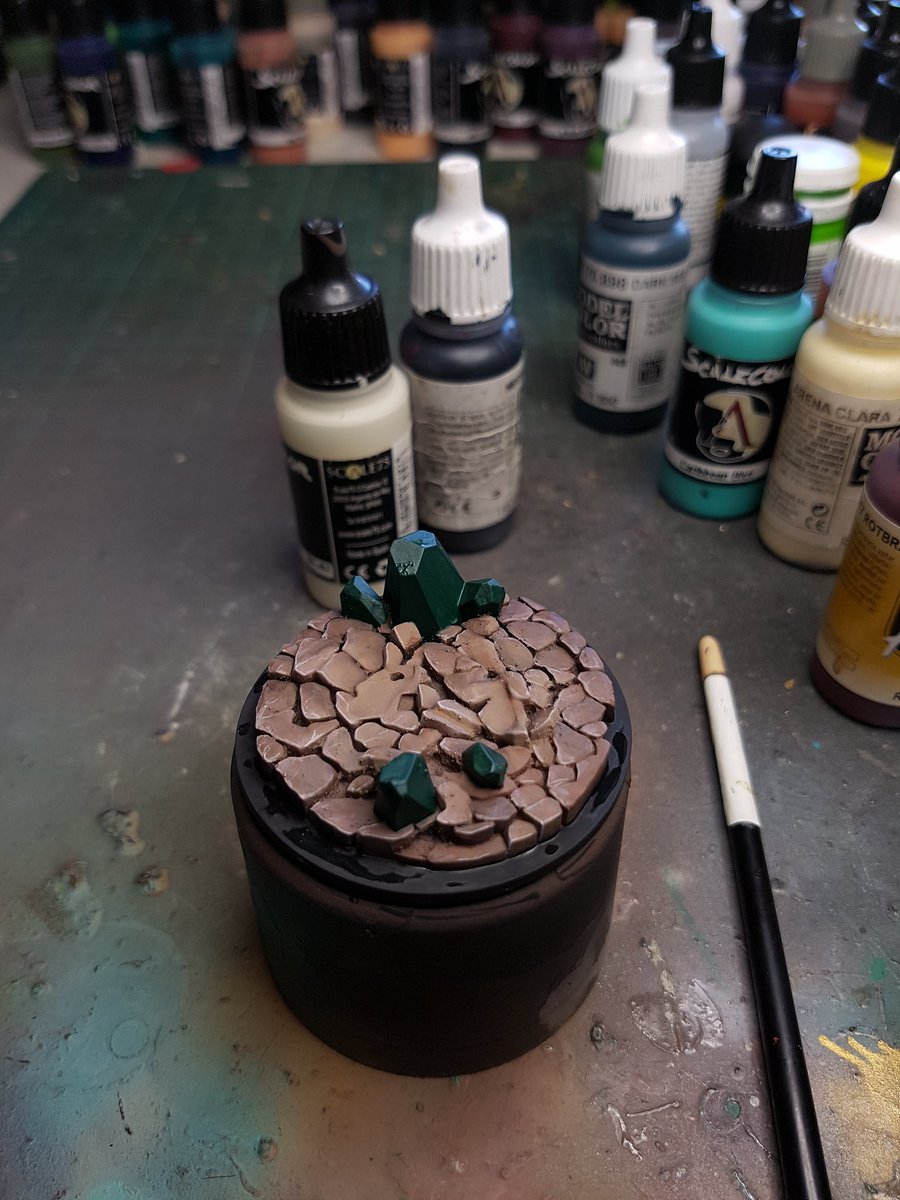
At this point I shifted tack. I wanted to paint the base and see how that would pan out, as it is important that a base works with the model, setting it off but at the same time not taking too much focus.
I airbrushed a few different browns, starting with the same colour that I had used on the hair and the skin tone and the leathers of Bastian to tie it all together. The rocks I then painted in green, and edge highlighted the rocks. It looked pretty good already, one of the advantages of the presculpted bases.
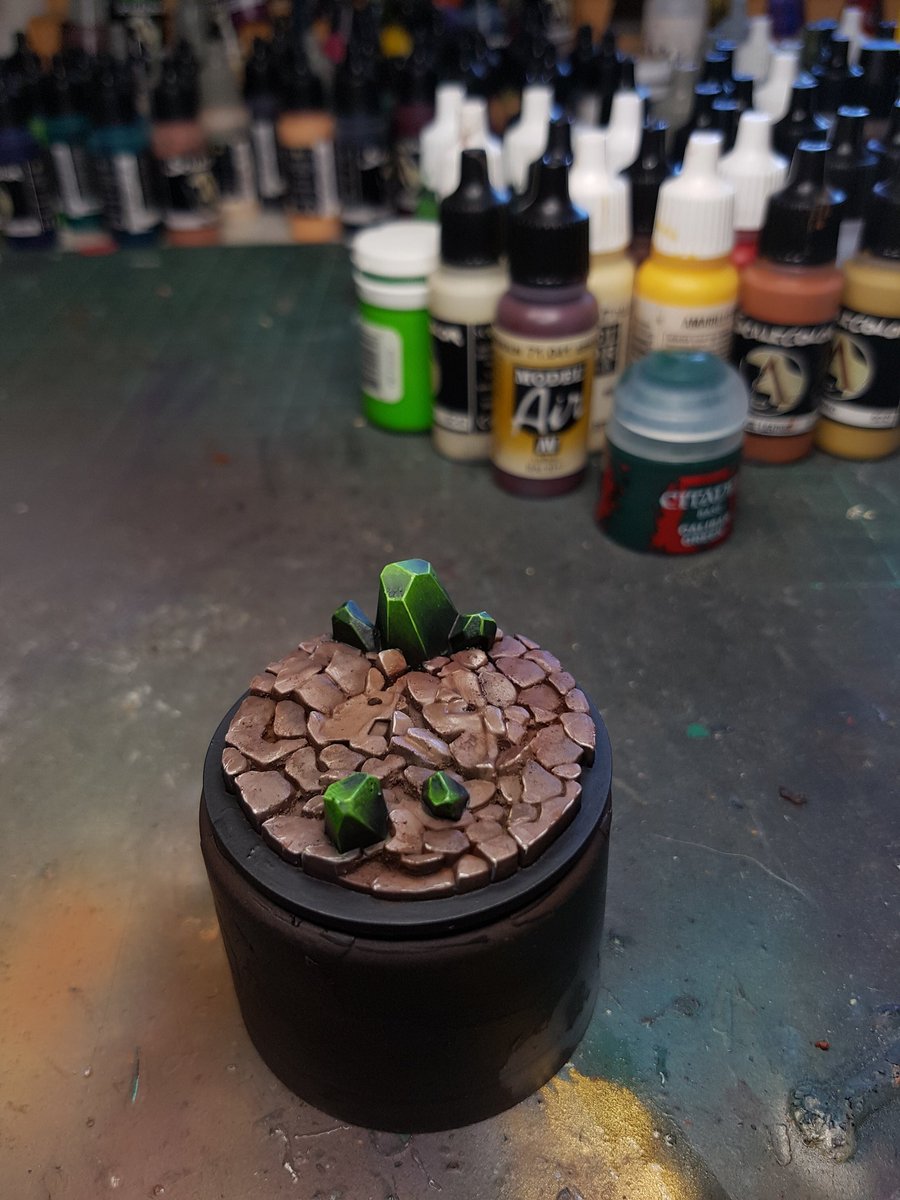
I wanted to soften the look of rocks and add just a tiny bit of texture, so I plastered them with pigments, and then painted the rocks. I kept the highest highlight on the rocks much lower value than the model itself, I want the rocks to look the same, but not have the same impact. I put more shading and used a bit more of the reddy brown to shade with.
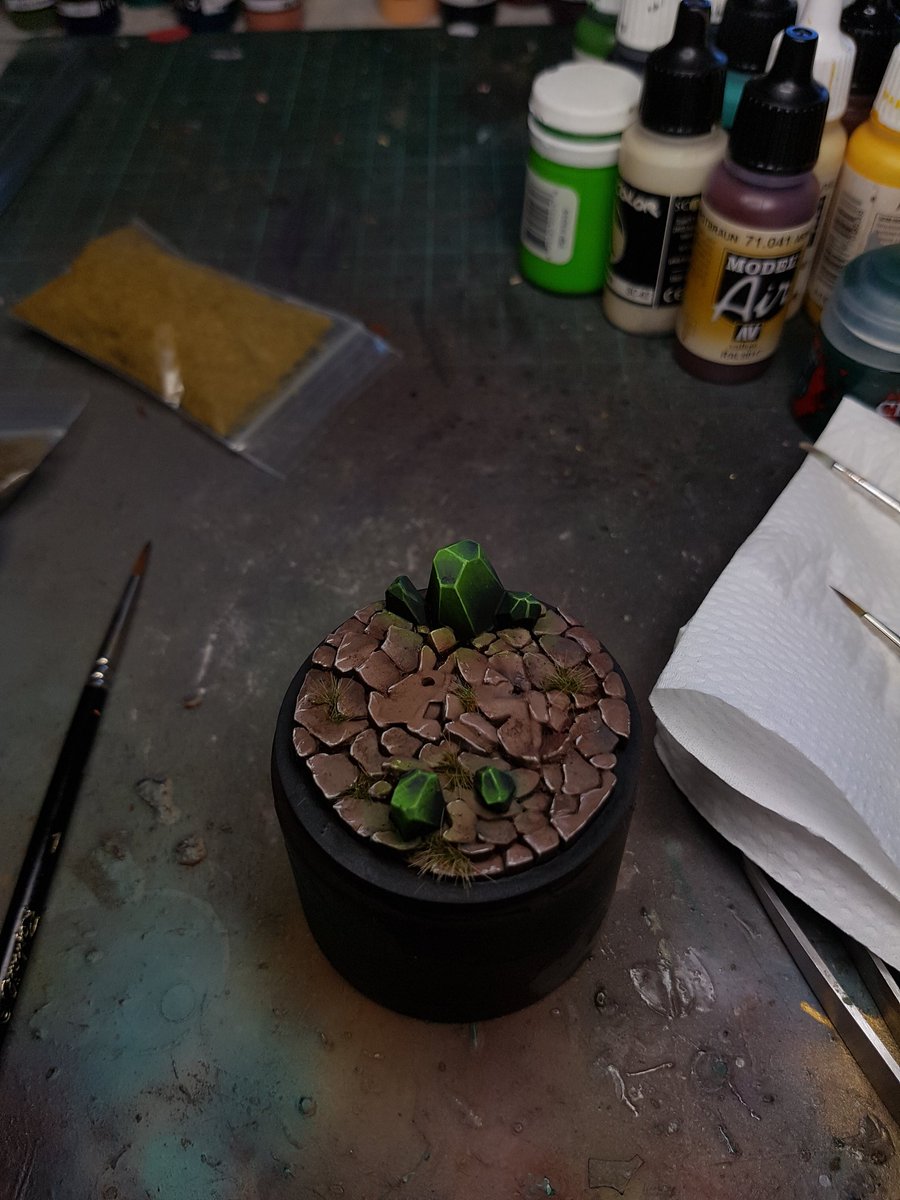
Final step was adding some grass, putting a few more little touches of highlight and smoothing everything out. I may add a few little leaves scattered over the base later on as well. but I will wait to see the model on there before deciding. I added some subtle glow from the rocks, and the base was pretty much done!
Back into Bastian:
Often its little things that make a difference, and painting the staff wrapping and letters on his cloak made a huge difference to making the model look more finished. I smoothed out the transition between the letters and the cloth, and I actually darkened the overall value of the bone areas, because they were too similar in tone to the blue.
The leather areas I started finalising, and the staff got fixed up. You can start to see the model coming to life now.
I wanted an aged red leather look to the book, a fantastic suggestion from one of my twitter followers.
I began working back on the blue areas, adding highlights, smoothing transitions, deepening shadows, and making sure it all popped. I then painted the scrolls at his sides, and made sure all the areas I would be painting in metallics were black. Finally I wrote some stuff in the book, fixed up all the little things, and glued the model to his base.
Really happy with how he is coming together. You can see how the base ties in with the model, the green rocks more subtle on the base but still the same colours, the browns the same tone as the leather strapping and skin tones, all of it working together. I am happy with how ti all looks. I have a few little things to finish up, tweaks and subtle changes to make, and the metallics left to paint.
Here is a list of things I want to do:
- Freehand on the eyepatch
- Adding some dirt on the ends of the cloak, and working a little more on the fabric textures
- Leaves on the base
- Glow emanating from the stones on his body
Once they are finished, and the metallics are painted, we will have a finished Bastian!
Cheers
Trent
The first area I did was finalise the green tone. I wanted to do was make sure that the green was more desaturated than the green on the crystals, it needed to look harmonious but not take all the focus away from the rocks. I shaded it down with more red and dark blue colours, to deepen it and smooth it out. I then started on the bone coloured sections, I've often gone overboard with that colour because I think it looks so good when well painted, but this model it really worked with the other colours.
From there I kept building on the colours, adding a slight green glow to the eyepatch and adding blue wrapping to the staff.
At this point I shifted tack. I wanted to paint the base and see how that would pan out, as it is important that a base works with the model, setting it off but at the same time not taking too much focus.
I airbrushed a few different browns, starting with the same colour that I had used on the hair and the skin tone and the leathers of Bastian to tie it all together. The rocks I then painted in green, and edge highlighted the rocks. It looked pretty good already, one of the advantages of the presculpted bases.
I wanted to soften the look of rocks and add just a tiny bit of texture, so I plastered them with pigments, and then painted the rocks. I kept the highest highlight on the rocks much lower value than the model itself, I want the rocks to look the same, but not have the same impact. I put more shading and used a bit more of the reddy brown to shade with.
Final step was adding some grass, putting a few more little touches of highlight and smoothing everything out. I may add a few little leaves scattered over the base later on as well. but I will wait to see the model on there before deciding. I added some subtle glow from the rocks, and the base was pretty much done!
Back into Bastian:
Often its little things that make a difference, and painting the staff wrapping and letters on his cloak made a huge difference to making the model look more finished. I smoothed out the transition between the letters and the cloth, and I actually darkened the overall value of the bone areas, because they were too similar in tone to the blue.
The leather areas I started finalising, and the staff got fixed up. You can start to see the model coming to life now.
I wanted an aged red leather look to the book, a fantastic suggestion from one of my twitter followers.
I began working back on the blue areas, adding highlights, smoothing transitions, deepening shadows, and making sure it all popped. I then painted the scrolls at his sides, and made sure all the areas I would be painting in metallics were black. Finally I wrote some stuff in the book, fixed up all the little things, and glued the model to his base.
Really happy with how he is coming together. You can see how the base ties in with the model, the green rocks more subtle on the base but still the same colours, the browns the same tone as the leather strapping and skin tones, all of it working together. I am happy with how ti all looks. I have a few little things to finish up, tweaks and subtle changes to make, and the metallics left to paint.
Here is a list of things I want to do:
- Freehand on the eyepatch
- Adding some dirt on the ends of the cloak, and working a little more on the fabric textures
- Leaves on the base
- Glow emanating from the stones on his body
Once they are finished, and the metallics are painted, we will have a finished Bastian!
Cheers
Trent
Sunday, 15 January 2017
Judgement: Bastian Part 2
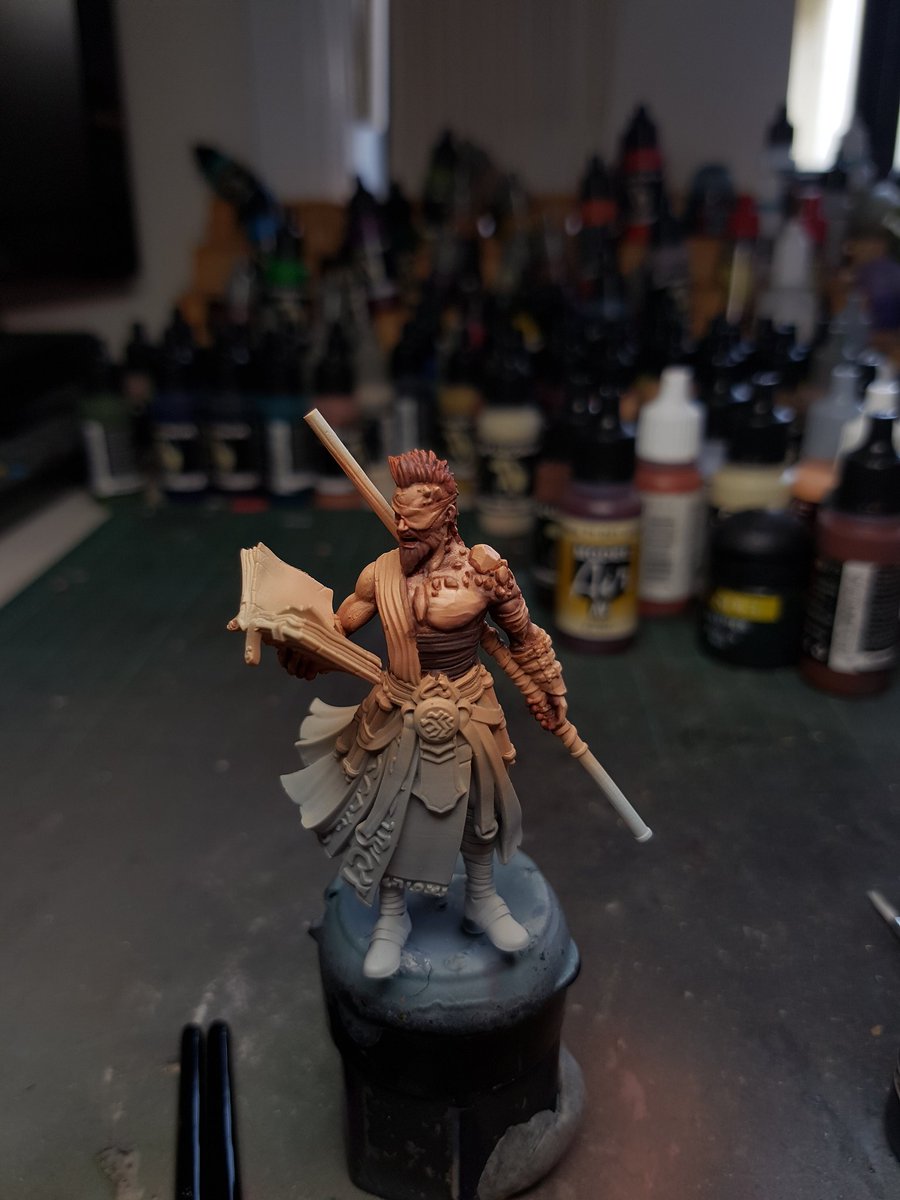
The project taking up the majority of my brain power at the moment is this one! This model which will hopefully be featured on the Kickstarter page for Judgement the game, is a really fantastic cast. I have selected a colour scheme which I am very happy with, planned it all out and once I undercoated the guy, I got started with the airbrush for some skin.
I used Armour Brown, Beige Red and Pale Sand in varying combinations to get the first layers of painting down. I then went back in with a brush, added some Hull Red, and some Inktense Red to the skin areas. The key for this guy is the crystals, and since I've planned them to be green, I want the skin to have a reddish hue so that it contrasts more with the green. Same reason for his red hair!
Kept working away on the contrasts here, adding colour and trying to smooth it all out. The trickiest part of painting this guy so far has been the rocks. I was really struggling with the skin in general, and then I used Armour Brown to edge around each of the rocks. Suddenly the skin looked a lot more clean, and I could see where things needed to be highlighted a lot easier.
One thing I've noticed more I paint, (no doubt also thanks to the painting classes with Raffa and Meg I've done) that the contrasts across a whole model are important, as well as how a model looks with all the colours complementing each other. So I can gauge exactly how everything is working together, I have started adding in the other colours, the green crystals, brown for the strapping, his hair etc.
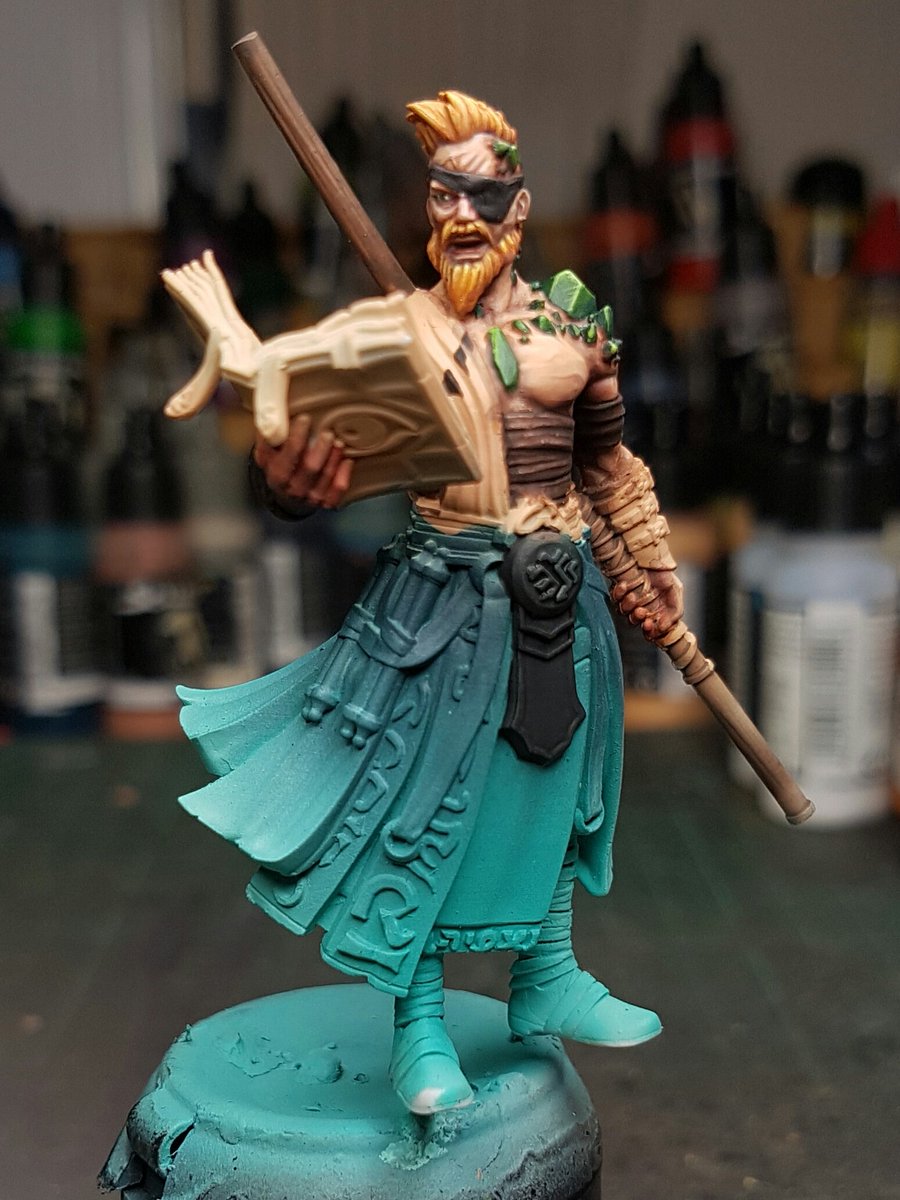
I airbrushed Carribean Blue from Scale 75 and shaded it with Dark Sea Blue, and began filling in all the other little details and colours.
And this is where I left Bastian last night. He has a couple of areas left which I am unsure about what colours I should go with, but the overall colours of the piece is starting to come together. I will be dropping the value of that green down, I will be shading it with the same dark blue on the other areas to try and create some harmony between the colours. The really fun part starts now, as I begin to push the contrast, and make things really pop off the model.
Thanks for reading!
Cheers
Trent
I used Armour Brown, Beige Red and Pale Sand in varying combinations to get the first layers of painting down. I then went back in with a brush, added some Hull Red, and some Inktense Red to the skin areas. The key for this guy is the crystals, and since I've planned them to be green, I want the skin to have a reddish hue so that it contrasts more with the green. Same reason for his red hair!
Kept working away on the contrasts here, adding colour and trying to smooth it all out. The trickiest part of painting this guy so far has been the rocks. I was really struggling with the skin in general, and then I used Armour Brown to edge around each of the rocks. Suddenly the skin looked a lot more clean, and I could see where things needed to be highlighted a lot easier.
One thing I've noticed more I paint, (no doubt also thanks to the painting classes with Raffa and Meg I've done) that the contrasts across a whole model are important, as well as how a model looks with all the colours complementing each other. So I can gauge exactly how everything is working together, I have started adding in the other colours, the green crystals, brown for the strapping, his hair etc.
And this is where I left Bastian last night. He has a couple of areas left which I am unsure about what colours I should go with, but the overall colours of the piece is starting to come together. I will be dropping the value of that green down, I will be shading it with the same dark blue on the other areas to try and create some harmony between the colours. The really fun part starts now, as I begin to push the contrast, and make things really pop off the model.
Thanks for reading!
Cheers
Trent
Lord of the Spirits, Part 1
I was waiting on a delivery from RN Estudio for a long long time (September last year!) and Australia Post finally came through with the goods, three months after it left Spain. I've not ever had a package get lost, but I've certainly had some take a long time!
Anyway so in the order were the following models:
Yes, this model was one I was waiting on. One of my miniature painting enthusiast colleagues had also purchased a copy of this model, and I was able to borrow his to paint up for Crystal Dragon until mine finally arrived. I was very happy to hand it over to him!
I purchased a subscription to the Miniature Mentor painting videos a little while back, and one of the most exciting and interesting ones was with Mirko Cavalloni, where he painted a Minotaur, recreating a scene called the Dark Forest. This is an armoured version of the same guy, and although I loved the other model, I decided on this one as I had a cool vision for it.
The final model was this one, a sculpt by my latest man crush, Lucas Pina. His sculpting is just off the chain, with his 3 Witches and Baba Yaga some of the most insane models I've ever seen. This is another of his works, and it comes with a plethora of add ons and doodads. I was really excited to paint this model, so much so that the moment it arrived I started assembling it!
Recently I've not been enjoying a lot of aspects of my models. I start off with visions in my head, and then for various reasons they do not follow along the path I expect. I tried to isolate what it was and I think I have it figured out. I am not strong at basing. I try to tell a story and usually have interesting ideas, but either the base overpowers the models, or I do not nail the painting, or it is poorly constructed.
So with this model, I laid out a concrete plan in my head, and also set myself a goal, ensuring that the base itself would be simple, elegant, tie in with the colours of the model, be harmonious but not overpowering and just look like a base that belongs to a showpiece model.
Here is the first stages.
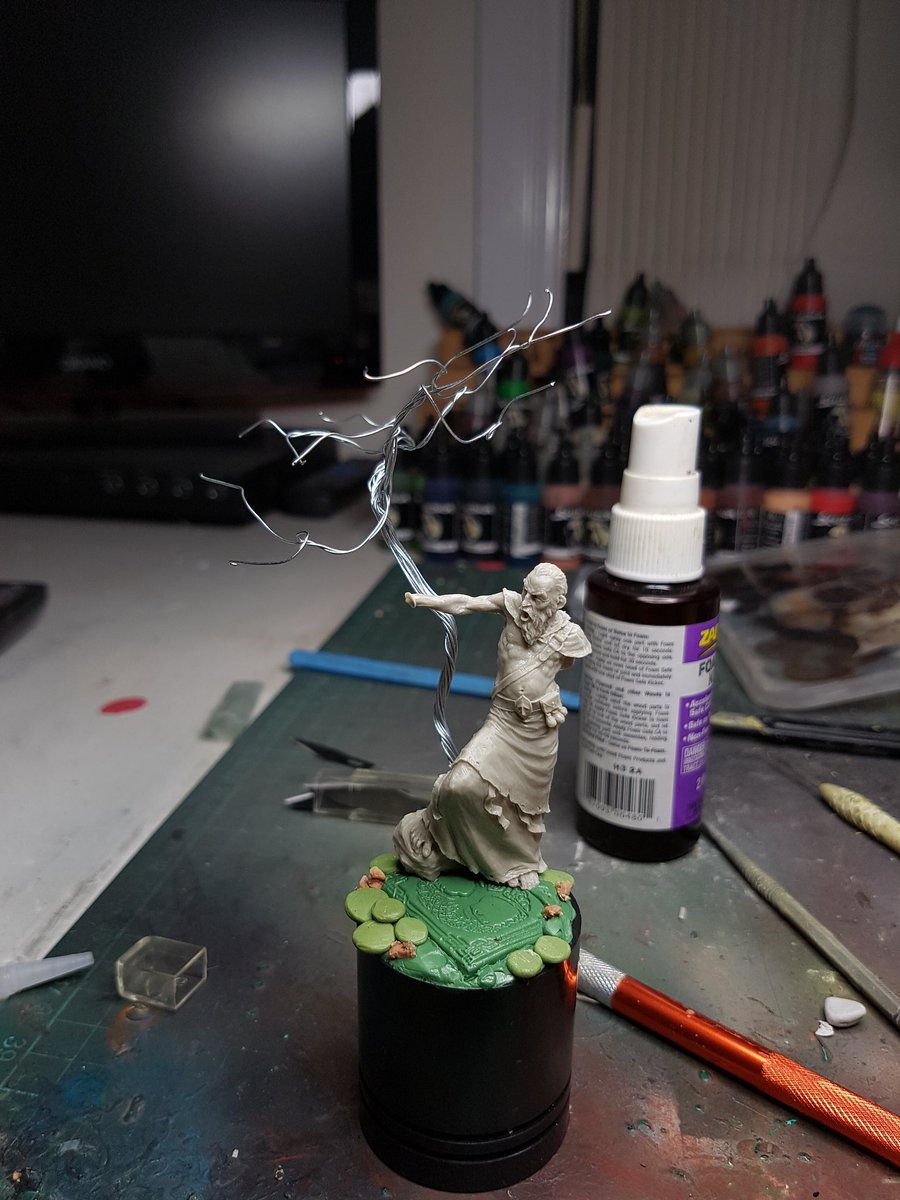
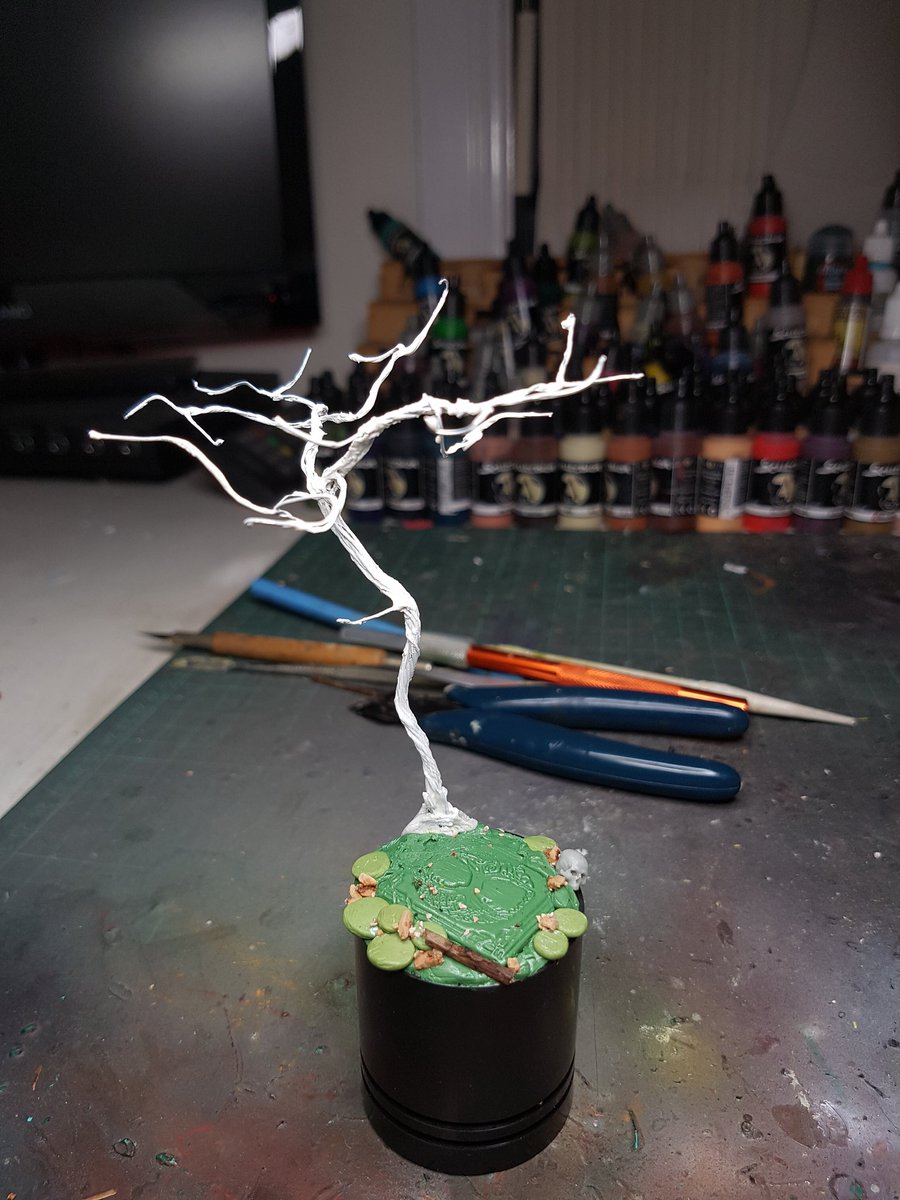
I've used a rolling pin from Green Stuff World to put a celtic tree pattern onto a tile, added some round rocks (a great tip from Massive Voodoo, when you have mixed too much putty, roll it up, smoosh it flat and just add a few little textures, and leave it to dry) that I had accumulated, some smaller rocks, and made a tree out of wire.
I added a skull, a twig, some more rocks, and covered the tree branches with Vallejo Plastic Putty, making it look a lot less like wire.
Once that all dried, I went over the base with some sandy paste, and a bit more sand textures. I added some of the doodads from the model onto the tree, and I sculpted the roots of the tree running down the side of the base. Everything continuing exactly according to the plan so far!
The next stage was an interesting one. I had tried texturing the tree I did on the Enchanted Pool by rolling a twig over it, adding real life texture to it, but I didn't really think it looked natural. This is also a dead tree, so I tried a different technique;
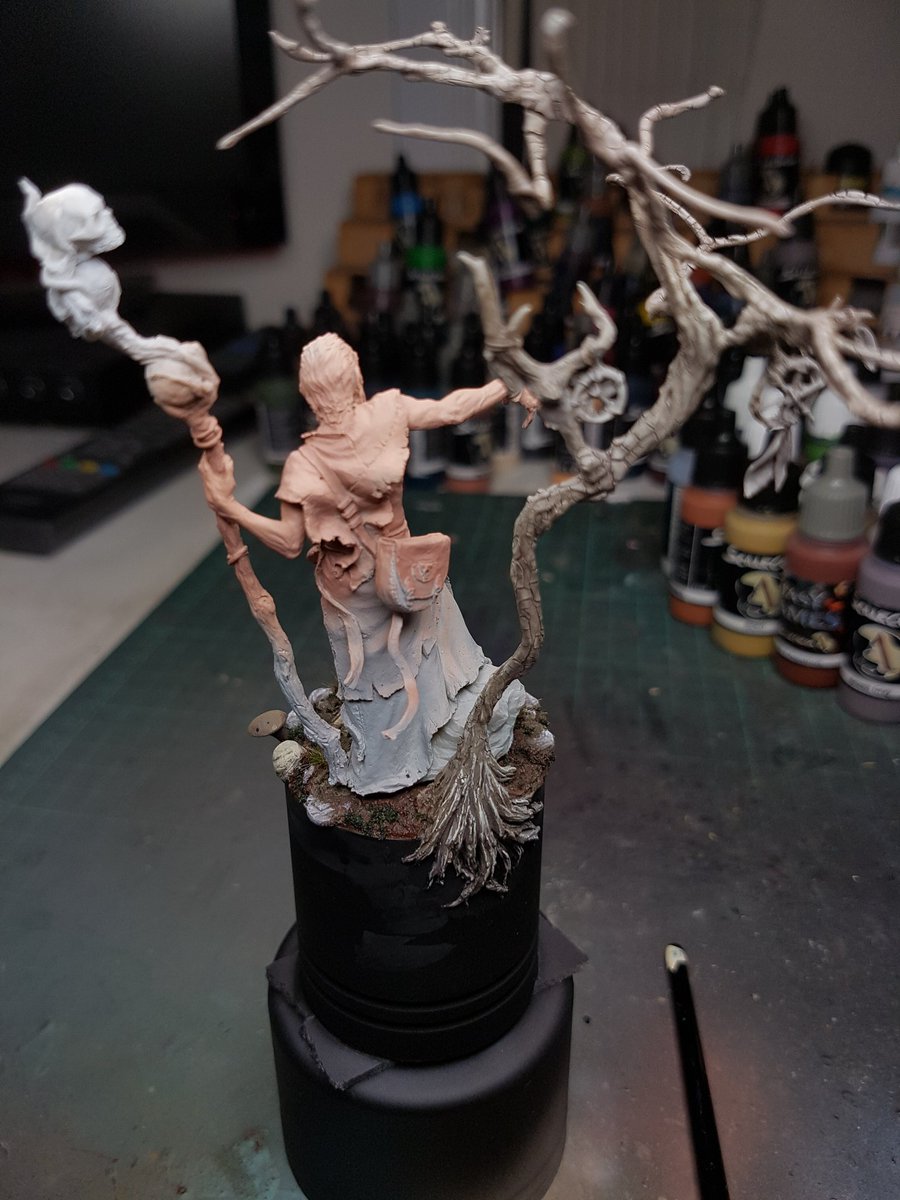
I gave the tree another layer of plastic putty, and then hit it with the GW technical paint that cracks on the surface. It came out like that, which I was very happy with overall. At this stage I decided it was time to paint!
I undercoated both the model and the base, and then whipped out the airbrush for a few layers.
And that is where I left it at last night. The base is nice and desaturated and also quite neutral, but I do think I want to just put a tiny bit more pigment on it to push it even further. The tree I started highlighting, but it needs more and I also have to figure out how I will do the foliage (only part of the plan I didn't work out before I did the base).
Really excited for this guy, shaping up to be my best work yet. Might get it finished for Crystal Dragon, might not. Fingers crossed!
Cheers
Trent
Anyway so in the order were the following models:
Yes, this model was one I was waiting on. One of my miniature painting enthusiast colleagues had also purchased a copy of this model, and I was able to borrow his to paint up for Crystal Dragon until mine finally arrived. I was very happy to hand it over to him!
I purchased a subscription to the Miniature Mentor painting videos a little while back, and one of the most exciting and interesting ones was with Mirko Cavalloni, where he painted a Minotaur, recreating a scene called the Dark Forest. This is an armoured version of the same guy, and although I loved the other model, I decided on this one as I had a cool vision for it.
The final model was this one, a sculpt by my latest man crush, Lucas Pina. His sculpting is just off the chain, with his 3 Witches and Baba Yaga some of the most insane models I've ever seen. This is another of his works, and it comes with a plethora of add ons and doodads. I was really excited to paint this model, so much so that the moment it arrived I started assembling it!
Recently I've not been enjoying a lot of aspects of my models. I start off with visions in my head, and then for various reasons they do not follow along the path I expect. I tried to isolate what it was and I think I have it figured out. I am not strong at basing. I try to tell a story and usually have interesting ideas, but either the base overpowers the models, or I do not nail the painting, or it is poorly constructed.
So with this model, I laid out a concrete plan in my head, and also set myself a goal, ensuring that the base itself would be simple, elegant, tie in with the colours of the model, be harmonious but not overpowering and just look like a base that belongs to a showpiece model.
Here is the first stages.
I've used a rolling pin from Green Stuff World to put a celtic tree pattern onto a tile, added some round rocks (a great tip from Massive Voodoo, when you have mixed too much putty, roll it up, smoosh it flat and just add a few little textures, and leave it to dry) that I had accumulated, some smaller rocks, and made a tree out of wire.
I added a skull, a twig, some more rocks, and covered the tree branches with Vallejo Plastic Putty, making it look a lot less like wire.
Once that all dried, I went over the base with some sandy paste, and a bit more sand textures. I added some of the doodads from the model onto the tree, and I sculpted the roots of the tree running down the side of the base. Everything continuing exactly according to the plan so far!
The next stage was an interesting one. I had tried texturing the tree I did on the Enchanted Pool by rolling a twig over it, adding real life texture to it, but I didn't really think it looked natural. This is also a dead tree, so I tried a different technique;
I gave the tree another layer of plastic putty, and then hit it with the GW technical paint that cracks on the surface. It came out like that, which I was very happy with overall. At this stage I decided it was time to paint!
I undercoated both the model and the base, and then whipped out the airbrush for a few layers.
The skin is made up of an armour brown basecoat, then beige red primed zenithally. This was supposed to be one opaque colour but I figured a bit of extra depth wouldn't hurt.
I went to town on the base, using the same armour brown, and then painted to sandy colours. I highlighted the rocks, the ground got pigments, the tile got highlighted, the tree got airbrushed with grey and then washed to bring out the crackling, I added flock, some more green pigments and some mossy stuff.
And that is where I left it at last night. The base is nice and desaturated and also quite neutral, but I do think I want to just put a tiny bit more pigment on it to push it even further. The tree I started highlighting, but it needs more and I also have to figure out how I will do the foliage (only part of the plan I didn't work out before I did the base).
Really excited for this guy, shaping up to be my best work yet. Might get it finished for Crystal Dragon, might not. Fingers crossed!
Cheers
Trent
Finished Luz, New York
The first of a number of updates for the day!
I finished off Luz, who is now up on Putty and Paint. She is actually one of my favourite things I've done. I am starting to feel like things are all coming together for me as a painter, and I am feeling like this year I will start to produce some really good things.
You can find her here on Putty and Paint:
http://www.puttyandpaint.com/projects/11605
She is also up for sale here:
Models for Sale!
Thanks for all your support!
Cheers
Trent
I finished off Luz, who is now up on Putty and Paint. She is actually one of my favourite things I've done. I am starting to feel like things are all coming together for me as a painter, and I am feeling like this year I will start to produce some really good things.
You can find her here on Putty and Paint:
http://www.puttyandpaint.com/projects/11605
She is also up for sale here:
Models for Sale!
Thanks for all your support!
Cheers
Trent
Subscribe to:
Posts (Atom)